The Data Import Process
When calling the make data step of SMARTER-database data generation, a series
of steps are performed in order to process raw data and to generate the final dataset.
This document tries to describe how the data import process works and how to add
new data to the SMARTER-database.
To add a new dataset into SMARTER-database, you need to call the following scripts
with specific option in data section of the Makefile
file. The order in which those import scripts are called matters, since importing
a sample into SMARTER-database means generating a unique smarter_id, which need
to be stable, in order to track the same object when updating the database or
in different releases. Scripts are written in order to be idempotent: calling the
same script twice with the same parameters will produce the same final result.
Defining a new dataset
The data import process start by defining a dataset as a .zip archive, which could
contain genotype or phenotype information (or other metadata). Dataset can also
be classified as foreground or background respectively if they are generated
in the context of the SMARTER project or before it. Accordingly to data source
type and provenience, you have to define a record in the proper .csv file
in data/raw folder, like the following:
#;File;Uploader;Size;Partner;Country;Species;Breed;N of Individuals;Gene Array;Chip Name
3;ADAPTmap_genotypeTOP_20161201.zip;smarterdatabase-admin;43.68MB;AUTH;36 Countries;Goat;144 breeds;4653;Genotyping data in plink binary format;IlluminaGoatSNP50
Next, dataset need to be imported by calling src/data/import_datasets.py
with the proper dataset type and input file, like the following example:
python src/data/import_datasets.py \
    --types genotypes background \
    data/raw/genotypes-bg.csv
This command will add this dataset as a new
Dataset object into the SMARTER-database
and will unpack its content in a folder with the MongoDB ObjectID inside the
data/interim folder. This let you to analyze and process the dataset content
using the SMARTER-database src code. For more information, see the
import_datasets.py help.
Exploring data with Jupyter Lab
Before importing genotypes and samples into the SMARTER-database, there is an additional data exploration step using Jupyter Lab: this step requires manual intervention to understand if data could be imported as it is or if some fixing steps are required. Common issues in datasets could be having different breeds with the same code, or using different codes to specify the same breeds. There could be the case where sample names within the genotype file are different from the ones used in metadata: in all those cases, you have to define a new metadata file where there will be a correspondence between the used value and the value to be inserted into the SMARTER-database.
In this data exploration step, you could check also the coding format of genotypes,
by calling the proper SmarterMixin
derived class. Metadata can also be integrated with external data sources,
which can be used to fix some stuff related to metadata. Start Jupyter Lab
(in an activated conda environment) with:
jupyter lab
then create a new notebook according your needs. Those notebook can also be used after the data ingestion to produce reports about the SMARTER-database status. Please, see the notebook section in the Cookiecutter Data Science project for more information.
Adding breeds to the database
Before upload samples into SMARTER-database, you have to register a
Breed first:
If the dataset have one or few breeds, you could define a new breed object by calling
add_breed.py like this:
python src/data/add_breed.py --species_class sheep \
    --name Texel --code TEX --alias TEXEL_UY \
    --dataset TEXEL_INIA_UY.zip
where the --species_class parameter specifies the source species (goat or
sheep), --name and --code specify the breed
name and
code used in the
SMARTER-database respectively, the --alias specifies the FID (the code) used
in the genotype file and the --dataset parameter specifies the dataset
sources of the sample we want to add. If you have to manage many different breeds
in the same dataset, it’s better to create breeds from a metadata file. In
such case, you can create your new breeds with a different script:
python src/data/import_breeds.py --species_class Sheep \
    --src_dataset=ovine_SNP50HapMap_data.zip \
    --datafile ovine_SNP50HapMap_data/kijas2012_dataset_fix.xlsx \
    --code_column code --breed_column Breed \
    --fid_column Breed --country_column country
in such case, we will have a --src_dataset and --dst_dataset which let
to specify the dataset where the metadata information are retrieved (using the
--datafile option) and the dataset where these information will be applied:
parameters like these can be provided to other import scripts which rely on
a metadata file and one or two distinct datasets.
The other parameters let to specify which columns of the metadata file will be
used when defining a new breed. See import_breeds.py
documentation for more information.
Note
Breed name and code are unique in the same species (enforced by MongoDB):
if you have the same breed in two different dataset, you need to call those
command twice: first time you will create a new
Breed object with the alias used
in the first dataset. Every other call on the same breed, will update the same
object to support also the new alias in the other dataset.
Adding samples to the database
Samples can be added in two ways: the first is when converting data from genotype
files, the second is by processing metadata information. The first approach should
be used when you have a single breed in the whole genotype file, and the breed
code in the genotype file have already a
Breed instance in the SMARTER-database:
this is the simplest data file, when data belongs to the same country and breed.
With this situation, you could create samples while processing the genotype
file simply by adding the --create-samples flag to the appropriate importing
script (for more information, see Processing PLINK-like files,
Processing Illumina report files and Processing Affymetrix files sections)
The second approach need to be used when you have different breeds in you genotype file, or when there are additional information that can’t be derived from the genotype file, like the country of origin, the sample name or the breed codes which could have different values respect to the values stored in the genotype file. Other scenarios could be Illumina report or Affymetrix report files which don’t track the FID or other types of information outside sample names and genotypes. Another case is when your genotype files contains more samples than metadata file, for example, when you want to track in SMARTER-database only a few samples: in all these cases, samples need to be created before processing genotypes, using the import_samples.py script:
python src/data/import_samples.py --src_dataset Affymetrix_data_Plate_652_660.zip \
    --datafile Affymetrix_data_Plate_652_660/Uruguay_Corriedale_ID_GenotypedAnimals_fix.xlsx \
    --code_all CRR --id_column "Sample Name" \
    --chip_name AffymetrixAxiomOviCan --country_all Uruguay \
    --alias_column "Sample Filename"
like import_breeds.py, we have --src_dataset
and --datafile to indicate where our metadata file is located; if our
genotype file is located in the same dataset of metadata, we can omit the
--dst_dataset parameter. Breed codes and country can be set to the same values
with the --code_all or --country_all parameters, or can be read from metadata
file like the following example:
python src/data/import_samples.py --src_dataset greece_foreground_sheep.zip \
    --dst_dataset AUTH_OVN50KV2_CHIOS_FRIZARTA.zip \
    --datafile greece_foreground_sheep/AUTH_OVN50KV2_CHIOS_FRIZARTA.xlsx \
    --code_column breed_code --id_column sample_name \
    --chip_name IlluminaOvineSNP50 --country_column Country
Please, look at import_samples.py help page to have more info about the sample creation process.
Note
Samples are always related to their source dataset, so you could have more
samples with the same original_id in SMARTER-database. However, samples
need to be unique in the same dataset, otherwise the genotype conversion
step will not work. If your dataset contains two or more samples with the
same original_id, you could specify an additional column (like the alias)
to identify your samples within genotype files
Processing genotype files
Genotype data is not added into the SMARTER-database, however this data is validated
with SMARTER-database, which track information on SNPs: in fact, genotype data could be
produced long time ago and with different technologies, so assemblies don’t match
and genotype calls need to be standardized in order to be compared. This is particularly
true when genotypes are referred according genomic sequence: since the chip probes
could be aligned to the forward/reverse strands, the same SNPs could have different
genotypes in different assembly versions. In such way, variants need to be converted
in order to compare datasets produced in different times with different approaches.
To accomplish this, variants need to be loaded into database from manifest, and supplementary
information need to be added into the smarter database: all those steps are managed
through Makefile by calling:
make initialize
before importing datasets into the SMARTER-database. For more information, see the Loading variants into database section of this documentation.
Converting genotypes to Illumina TOP
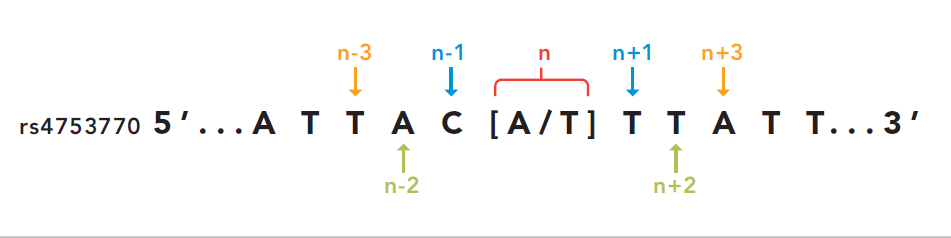
All the received genotypes are converted in illumina TOP format: this coding convention was introduced by Illumina and its main features is that SNP orientation is determined from the sequence around the SNP itself. This seems complex but has the advantage that the SNPs remains the same even if the SNP database or the genome assembly changes. In detail, illumina defines as unambiguous a SNP with only one of A or T calls: SNPs like A/G or A/C will be TOP snps; SNP with T/C and T/G are BOTTOM SNPs. All the other ambiguous cases are determined using the sequence walking method: starting from the SNPs itself, take a letter after and before and check if the resulting pair is ambiguous or not. If the pair is unambiguous, you can classify in TOP/BOTTOM. If the pair is ambiguous take the second letter after and before the SNP and check the resulting pair. This will be done until we can assign a TOP/BOTTOM coding to the SNP.
Credits: Illumina technical notes
In this example A/T is ambiguous even if is composed by A and T. The first
couple taken (T/C) is unambiguous so we can say that this example SNP is in BOTTOM orientation.
SMARTER genotypes are converted into Illumina TOP: this means that if a SNP is
already in TOP coding will be used as it is, but all the other cases need to be converted
into illumina TOP. The following is an example of coding conversion for
DU186191_327.1 SNP:
smarter_id |
source version |
source coding |
source genotype |
top genotype |
|---|---|---|---|---|
UYOA-CRR-000003890 |
OAR4 |
forward |
T C |
A G |
UYOA-CRL-000000382 |
OAR3 |
A/B |
A B |
A G |
NAOA-ADP-000001020 |
OAR3 |
top |
G A |
G A |
GROA-CHI-000004137 |
OAR3 |
forward |
T T |
A A |
In the previous example is easy to convert a SNP into illumina TOP: assumed that the
TOP genotype is A/G, every time a letter T or C is found it need to
be reversed. But how the snp OAR1_103790218.1 can be converted?
smarter_id |
source version |
source coding |
source genotype |
top genotype |
|---|---|---|---|---|
UYOA-CRR-000003890 |
OAR4 |
forward |
G G |
G G |
UYOA-CRL-000000382 |
OAR3 |
A/B |
B B |
G G |
NAOA-ADP-000001020 |
OAR3 |
top |
G G |
G G |
GROA-CHI-000004137 |
OAR3 |
forward |
C C |
G G |
This case is more complex since the C call is the complement of G, so you can’t
determine the coding of this genotype. The only way to determine the genotype coding
of this SNP is to check the coding of the other SNPs in the same dataset. The other
source of information required is the orientation of the probe to the reference genome.
Consider samples UYOA-CRR-000003890 and GROA-CHI-000004137: they have the
same TOP genotype since the probe is aligned to different strands in OAR3 and OAR4
assemblies, so only one genotype need to be reversed to get a TOP genotype. All the
information about SNP position and strand orientation are stored in
Variants and
Locations objects, and can be
accessed using the proper methods. The genotype conversion is managed by the
proper SmarterMixin derived class
method, called by the proper importing script.
So why convert genotypes into illumina TOP? Because illumina TOP SNPs are identical
in different genome assemblies, and this means that if you have a new genome
version you don’t need to convert the genotype,
you will need only to update the genomic positions of the SNPs.
For such reason, each genotype importing script has a --src_coding option with
let you to specify the genotype coding of the source file. Source coding will be
checked against SMARTER-database variant
information in order to be converted in Illumina TOP coding.
To read more about illumina TOP/BOTTOM coding convention, please see illumina technical notes documentation and also Simple guidelines for identifying top/bottom (TOP/BOT) strand and A/B allele and How to interpret DNA strand and allele information for Infinium genotyping array data.
Processing PLINK-like files
Genotypes provided as PLINK files (both text or binary) can be imported using the import_from_plink.py script, like in the following example:
python src/data/import_from_plink.py --bfile AUTH_OVN50KV2_CHIOS_FRIZARTA/AUTH_OVN50KV2_CHI_FRI \
    --dataset AUTH_OVN50KV2_CHIOS_FRIZARTA.zip --src_coding forward \
    --chip_name IlluminaOvineSNP50 --assembly OAR3
The --bfile/--file options (mutually exclusive) let you to specify a file prefix
(like PLINK does) for a binary/text file respectively. The --dataset option
lets to specify which dataset contains the genotype file; --src_coding option lets
to specify the source coding (if the provided coding does not match with database data,
the import process will fail). The --assembly parameter will be the destination
assembly version of the converted genotypes. There are also other parameter, for
example when you have source genotypes with rs_id or when the source assembly
is different from the destination assembly. For a full list os such options,
take a look to import_from_plink.py help page.
Processing Illumina report files
Genotypes provided as Illumina reports need to be processed using another script:
python src/data/import_from_illumina.py --report JCM2357_UGY_FinalReport1.txt \
    --snpfile OvineHDSNPList.txt --dataset CREOLE_INIA_UY.zip --breed_code CRL \
    --chip_name IlluminaOvineHDSNP --assembly OAR3 --create_samples
In this case the Illumina report file need to be specified with the --report
option, while the SNPs information file need to be specified with the --snpfile
option. This command, like import_from_plink.py and
import_from_affymetrix.py let to create samples
while reading from genotypes using the --create_samples flag. Since illumina
report files doesn’t track information about FID, breed codes need to be specified
using --breed_code parameter only for one breed samples file: files with multiple
breeds can’t be imported like this, samples need to be created before with
import_samples.py in order to retrieve the correct
information from SMARTER-database. Please see
import_from_illumina.py manual pages to get other
information regarding this program.
Processing Affymetrix files
Affymetrix genotypes can be provided using reports format or PLINK like format (which lacks of some columns unlike standard PLINK files). Even in this case, there will be a proper script to call and custom parameters to specify:
python src/data/import_from_affymetrix.py \
    --prefix Affymetrix_data_Plate_652_660/Affymetrix_data_Plate_652/Affymetrix_data_Plate_652 \
    --dataset Affymetrix_data_Plate_652_660.zip --breed_code CRR --chip_name AffymetrixAxiomOviCan \
    --assembly OAR3 --sample_field alias --src_version Oar_v4.0 --src_imported_from affymetrix
In this example, the --prefix parameter means load data from a PLINK-like
file. The other input source type could be specified with the --report option.
Other parameters are already been described with other import script, with the
exception of --sample_field, which let to search samples using a different
attribute, and the source of the assembly (both --src_version and
--src_imported_from) which is required to convert genotypes into Illumina
TOP. For other information, please see the import_from_affymetrix.py
help page.
Adding metadata information
Next step in the data import pipeline is importing metadata into SMARTER-database: those data can’t be provided in the final genotype file, and so will be made available through the SMARTER-backend with the help of the r-smarter-api R package and SMARTER-frontend. There are two main scripts to import metadata: import_metadata.py and import_phenotypes.py. import_metadata.py should be used to import GPS coordinates and other generic metadata fields, while import_phenotypes.py should be used to import phenotypes. Both two scripts can be used to apply information to all the samples belonging to the same breed or to each sample belonging to the same datasets, relying on metadata defined for each breed group or each distinct sample. For example, to load data with GPS coordinates and additional columns you can call import_metadata.py like this:
python src/data/import_metadata.py --src_dataset "High density genotypes of French Sheep populations.zip" \
    --datafile Populations_infos_fix.xlsx --breed_column "Population Name" \
    --latitude_column Latitude --longitude_column Longitude --metadata_column Link \
    --metadata_column POP_GROUP_CODE --metadata_column POP_GROUP_NAME
In this example, metadata are applied by breed using the --breed_column.
Parameters like --src_dataset/--dst_dataset and --dataset have the same
behavior described in import_samples.py. All the additional
metadata column can be loaded by calling multiple times the --metadata_column
parameter by providing the desired column in metadata file. Similarly, this
applies also for import_phenotypes.py as described
in the following example:
python src/data/import_phenotypes.py --src_dataset ADAPTmap_phenotype_20161201.zip \
--dst_dataset ADAPTmap_genotypeTOP_20161201.zip \
--datafile ADAPTmap_phenotype_20161201/ADAPTmap_InfoSample_20161201_fix.xlsx --id_column ADAPTmap_code \
--chest_girth_column ChestGirth --height_column Height --length_column Length \
--additional_column FAMACHA --additional_column WidthOfPinBones
This time, phenotype metadata are loaded for each sample, as described by the
--id_column parameter. Then there are parameters which describe a single
phenotype trait, like --height_column or --length_column, while additional
phenotype traits not described by the Phenotype
class, can be loaded with the --additional_column parameter, which can be
specified multiple times.
Merging datasets together
Last step of data import is merging all the processed genotype files into one dataset for species/assemblies. You can do it by calling merge_datasets.py like this:
python src/data/merge_datasets.py --species_class sheep --assembly OAR3
This script will search all processed genotype files for the same species/assembly
and will merge all the genotypes in one file. The final genotype will be placed
in a new directory with the same name of the desired assembly under the data/processed
directory.